Tag Archives: prepper

Beet Gardening for Success and Food

Beet Gardening for Success and Food

Beets are a root vegetable that has been cultivated for thousands of years. They are biennials grown as an annual in the garden. Their origin is unclear, but they are believed to have originated in the Mediterranean region or possibly in Egypt. The ancient Greeks and Romans used beets for medicinal purposes and as food. Beets were also used as a natural dye, particularly for fabric and leather. Today, they are grown all over the world, with the largest producers being Russia, the United States, and Poland. Beet Gardening for Success and Food is not difficult.

Types and Varieties of Beets

There are several varieties of beets, each with its own unique characteristics. The most common are red beets, golden beets, and chioggia beets.

Red beets are the most common. They have a deep reddish-purple color and are often used in salads, soups, and roasted dishes.

Golden beets have a bright, sunny yellow color and are milder in flavor than red beets. They are often used in salads and roasted dishes.

Chioggia beets, also known as candy-striped beets because of their striking red and white striped flesh, have a slightly sweeter taste than red beets and are often used in salads and as a garnish.

Choosing Beet Varieties: Color and Days to Maturity

When choosing a beet variety, differences such as flavor, texture, size, sugar content (the roots are typically high in sugar, 8% to 20%), and days to maturity should be considered. Here are three examples of the many to choose from:

  1. Red Ace – This variety produces round, smooth, deep-red beets that are about 3 inches in diameter. They mature in about 55 days and have a sweet, tender flesh.
  2. Golden Detroit – This variety produces medium-sized, round, golden-yellow beets that are about 2-3 inches in diameter. They mature in about 55 days and have a mild, sweet flavor.
  3. Chioggia – This variety produces medium-sized, round beets with a distinctive red and white striped flesh. They mature in about 60 days and have a sweet, tender flavor.
  4. Lutz Green Leaf is a large plant with tasty green leaves. Its baseball-sized, heart-shaped roots are sweet and tender and it and stores well. With their large size, these beets take a bit longer to mature at about 80 days.

Growing Beets Tips for Planting, Care, and Harvesting

It will take approximately 2 ounces, roughly 1,500 beet seeds, to plant a 100 foot row. In a good year, the yield would be about 80 to 100 lbs. of roots – excluding the greens. If you are planning a “year-round” food supply, plant about 10 – 15 feet per person. That would provide approximately 8 lbs. – 15lbs. per person – roughly 40 to 60 beet roots which can be turned into 8 to 15 pints of canned beets. Beet Gardening for Success and Food will provide vitamins, minerals, and important nutrients.

Soil

Beets prefer well-drained, loose soil that’s rich in organic matter. Add compost or well-rotted manure to the soil a few weeks before planting. Soil pH should range between 6.0 to 7.5. If your soil is too acidic, add lime to raise the pH level. If it’s too alkaline, add sulfur to lower the pH level.

Planting

Beets can tolerate cold and near freezing conditions but do best with temperatures from 50°F to 75°F. They do not do well in hot weather. The roots can get tough and fibrous. They are a perfect option for spring and fall crops in northern zones or as a winter crop in zone 9 and higher.

Beets can be grown by either sowing seeds directly into the garden or transplanting seedlings. Whether you decide to direct sow into the garden or start your seeds in pots, soak seeds for 24 hours before planting. You need to understand that beet “seeds” are a cluster of several small seeds together. After the seeds germinate and the seedlings are 2 inches tall pull the weaker shoots to allow the strongest the room it needs.

This variety produces round, smooth, deep-red beets that are about 3 inches in diameter. They mature in about 55 days and have a sweet, tender flesh.

When starting seeds indoors for transplanting, use small 2” x 2” pots so the seedlings have enough room to grow – both above and below the soil line. Try to start the seeds about 30 days before your last spring frost. I use a sterile seed starting mix. Soak seeds for 24 hours then plant 1/2” deep and place the pots under grow lights. When daytime temperatures are expected to average 50°F and danger of frost has past, transplant into the garden.

When direct sowing, begin planting as soon as the soil has warmed to about 45°F. Beet seeds should be planted about 1/2 inch deep and spaced about 2 inches apart, space rows about 12” to 18” apart. To ensure maximum germination, keep the soil moist. Seeds should germinate in 7 to 15 days. When the seedlings are 6” tall, pull every other plant. The final spacing between plants should be a minimum of 4” – 6”. You can use what you pull – both roots as well as greens.

Plantings can be made every 2 weeks before mid-summer. One way to judge when to stop planting in the spring is to check average temperatures in your area. When the average temperature is expected to average over 80°F, count back 60 days – that should be the last date for spring planting. For Autumn planting, start sowing seeds 10 – 11 weeks before frosts are expected.

Watering

Beets need consistent moisture to grow properly, but they don’t like to be waterlogged. Water regularly, but don’t overwater. An inch of water each week is recommended for proper growth. Mulching around the plants can help to retain moisture and suppress weeds.

Sun Exposure

Beets prefer full sun, but they can also grow in partial shade. However, if grown in too much shade, they may not develop the deep, rich color and flavor that they’re known for.

Fertilizer

Beets are heavy feeders, however, choose a fertilizer that is lower in nitrogen than both potassium and phosphorus. Too much nitrogen will lead to more leaf growth at the detriment to the roots. You can also add a side dressing of compost or other organic fertilizer once or twice during the growing season.

Beet Gardening for Success and Food This variety produces medium-sized, round beets with a distinctive red and white striped flesh. They mature in about 60 days and have a sweet, tender flavor

Problems, Pests, and Diseases

Beets are generally resistant to pests and diseases, but there are a few that can cause problems. The most common pests are aphids and leaf miners.

Aphids can be controlled by spraying the plants with a solution of water and dish soap.

Leaf miners can be controlled by removing infected leaves and applying a natural insecticide.

Flea beetles are a common pest problem. They damage leaves by leaving numerous tiny holes in beet leaves. If the infestation is bad enough the plants can be killed. Two organic methods to control flea beetles are:

  • using floating row covers to protect the plants and
  • adding beneficial nematodes in the soil to attack and kill the beetle larvae.

Cabbage loopers, tiny green caterpillars that can destroy the plant can be controlled by using Bacillus thuringiensis (Bt) to control.

A common disease affecting beets is powdery mildew. This can be prevented by ensuring good air circulation around the plants and avoiding overhead watering. If powdery mildew does occur, remove infected leaves and apply a natural fungicide.

Keep beets well-irrigated to prevent scab, the same disorder that affects potatoes, causing raised brown rough spots on the mature roots.

Boron deficiency in the soil can cause an internal breakdown or browning. This is most likely to occur in alkaline soils after prolonged hot, dry periods. If this happens, get a soil test to confirm. Adding one tablespoon of borax to a gallon of water will provide enough boron for a 250 square foot garden to fix.

Damping can impact seedlings (both direct sow as well as in the greenhouse) Different forms of soil-borne fungi that grow in wet, humid environments cause damping. It’s most likely damping off if the seedlings die unexpectedly not long after planting, and the plants look discolored and decaying. Enable the seed-starting mix to dry entirely before watering, and make sure your soil has good drainage. Do not overwater your plants.

Cercospora leaf spot is a fungus that occurs on the leaves as dark, patchy spots that may be yellow in color. Remove the affected leaves and throw them out, avoid touching healthy looking leaves. If your beets are planted close together, thin them out, so crowded plants have a better chance to grow. Cercospora can be controlled by spraying Mancozeb

Harvesting and Storing Beets

You should pull beets when the soil is dry. Be careful when pulling or lifting roots from the ground, if you need to use a pitchfork or shovel, do so carefully. Do not to break or injure the beets.

Beets can be harvested at any time however, they will mature at about 1 1/2 to 2 inches in diameter. Be sure to cut off the leaves about 1 inch above the beet before storing. The green tops are edible, and frankly very tasty. If you cut away the greens at the root, you may cause damage and the root to bleed.

Any roots that are damaged should be used within a few weeks, they will not store well and rot spots will start at any damage. To prepare any roots for storage, carefully rub soil from the roots, try not to wash but if you do, dry them.

Beets can be stored in a cool, dry place for several weeks. Store beets in a cold moist place as near to freezing as possible without actual freezing, 32°-40°F and 95 percent relative humidity in a container—a bucket or plastic storage box or cooler with moist sand, peat moss, or sawdust. Don’t pack roots too tightly; if the roots touch they can start to rot; be sure to leave 2 inches (5 cm) of insulating material around at the top, bottom, and sides of the stored roots. Set the lid loosely so that there is good air circulation.

For long term storage, beets can be cooked for about twenty minutes then frozen. They can also be pressure canned or pickled and canned using a hot water method, see Ball Jar Recipe Blog for recipes for both methods of canning.

By following these tips for planting, care, and harvesting, you can enjoy a bountiful harvest and enjoy a beet gardening for success and food

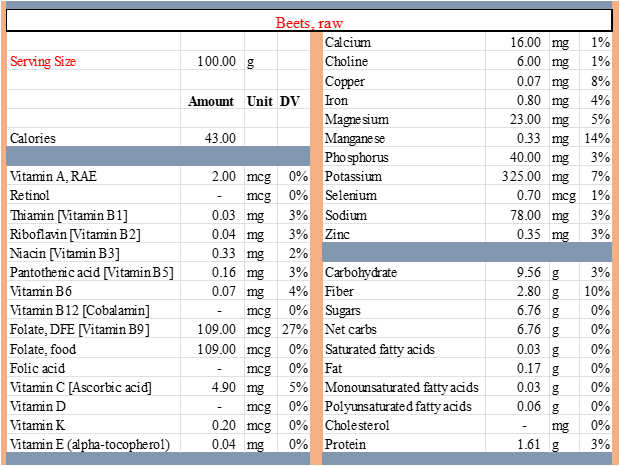
The below chart provides the calories, vitamins, minerals and other important nutrients provided by 100 grams (roughly 3 ounces) of raw beets. The information from this chart comes from USDA Nutrient Database

Beet Gardening for Success and Food

Hawthorn A Wild Edible

Hawthorn A Wild Edible You Can Forage

Back to Edible Plants

Hawthorn (Crataegus), also known as hawberry, quickthorn, whitethorn, and thornapple, is a member of the rose family and is a wild-growing plant that is used for food and medicine. Hawthorn a wild edible has all parts edible and foraging for hawthorn has become increasingly popular due to its versatile uses as food and herbal medicine. A quick search of the USDA Plant Database provides information for approximately 150 different species of hawthorns that range from shrubs to small trees that can reach upwards of 30 feet. Even more interesting, I have read there are well over 200 different types of hawthorns one of which can be found somewhere in North America. If you are interested in foraging, get to know the types of hawthorns that grow in your area.

Appearance

hawthorn a wild edible picture USDA plant database copy write free

Hawthorn is a term that encompasses multiple species. In general, they are shrubs to small trees growing to around 20 ft plus. As member of the rose family, the branches are covered with thorns. The branches develop deep fissures that reveal an orange interior under the gray-brown exterior. The berries look much like rose hips – red and round – but can be yellow, orange, blue, or black.

The plant leaves are wedge-shaped and have 5-7 lobes with fine teeth at the tip on some species while could be more “leaf like” with small serrations on the edges on others.

Hawthorns bloom in May and are covered with clusters of small white to red based flowers (depending on the specific species). The flowers give off a strong scent that is described in two very different ways – some say the blooms smell sweet and pleasant while other describe the scent as that of a rotting corpse. Both sides agree that the fragrance of a hawthorn tree in bloom is a strong scent that can be smelled from a distance.

Wild Growing Location

Hawthorn is native to Europe and can be found in Asia, Africa, Australia, and North America. The shrub grows wild along the edges of wooded areas and thickets and grows best in moist soil that is loose and rich with decomposed plant matter.

Hawthorn growing in the wild often create a natural living fence along the edge of a wooded area and is often planted as a living fence in large landscapes.

Flavor and Uses

Hawthorn a wild edible, its berries have a tart flavor while the plant leaves have a light floral flavor. The berries and leaves are used in the making of tea, wine, jelly, jam, ketchup, infused oil, and vinegar.

The young leaves and flowers are gathered in the spring and used in a fresh green salad. The leaves can be harvested anytime for making tea.

Hawthorn a Wild Edible Notes of Interest leaves and berries

The berries ripen in early fall and will be at their peak flavor after the first frost of fall. They can be harvested before frost but will have a tarter flavor.

The leaves, flowers, and berries are used to make tea for drinking or tinctures. The tea can also be used to add flavor to foods like rice or pasta by using it as a cooking liquid.

Nutritional Value

The edible plant parts are rich in vitamins B and C, fiber, and loaded with antioxidants. Antioxidants neutralize the free radicals (unstable molecules) in the body that are precursors to many chronic diseases, including cancer, heart disease, and diabetes.

Hawthorn is also a powerful anti-inflammatory that helps reduce the amount of inflammation in the body. Chronic inflammation can lead to debilitating diseases like diabetes, cancer, and asthma.

Hawthorn extract (tincture) has been shown in studies to significantly reduce the amount of blood fat in the body. Lowering the blood fat reduces high cholesterol to help reduce the risk of heart attack and stroke.

The natural fiber content of the berries aid in digestion and help improve gut health. The berries keep food moving swiftly through the digestive process for better elimination. Hawthorn extract has been shown in studies to provide a protective coating on the lining of the stomach to help treat and/or prevent stomach ulcers.

Hawthorn extract is rich in polyphenols (micronutrients) that are beneficial for skin and hair. One study shows that hawthorn extract is good for stimulating hair growth because it increases the size and number of hair follicles.

Harvesting Hawthorn

To harvest the leaves and flowers, prune off some of the branches from the tree in spring when the shrub is in bloom. If you are on the side of describing the flowers as smelling bad, the smell will fade as the flowers dry and the dried flowers don’t taste as bad as they smell.

Place the small branches with flowers and leaves intact in a paper bag and hang the bag upside down in a warm location until they dry. The dried leaves and flowers will be easy to remove from the branches, just be careful of the thorns.

Harvest the berries by carefully picking them off the plant in late summer or fall. Place them in a single layer in a warm location to dry or use a dehydrator to dry.

Grow Your Own

Plant hawthorn seeds in late February. Mix compost and leaf mold into the soil, plant 2 seeds in a hole that is 2-inches deep, and water well. Keep the soil moist until the seeds germinate.

You can start a new plant by taking a cutting from an older plant. Take a 10-inch cutting in spring, remove leaves, dip the cut end into rooting hormone and insert 2-inches deep into a container of potting soil. Place container in a shaded area and allow the roots to develop then transplant outdoors.

Hawthorn a Wild Edible Notes of Interest

* Hawthorn has long been used as a natural way to control high blood pressure, lower high cholesterol, improve circulation, and increase blood flow to the heart. Hawthorn widens the blood vessels and increases the amount of blood that is pumped out of the heart during contractions.

* Hawthorn supplements typically include all parts of the plant. The leaves and flowers contain more antioxidants than the berries.

* Honey bees love the hawthorn shrub when it’s in full bloom. The abundant pollen produced by the flowers helps the bees create dark, nut-flavored honey known as ‘Hawthorn honey’.

*Tinctures and salves are also made from various parts of the hawthorn plant to treat skin disorders, like boils and open sores.

Wild Purslane A Wild Edible

Wild Purslane A Wild Edible

Wild Purslane A Wild Edible
Finding wild purslane is easy, just look down

Purslane (Portulaca oleracea), also known as Little Hogweed, Pusley, and wild portulaca, is an edible plant that grows wild in almost every climate and region of the world. Wild Purslane is a member of the Portulacaceae family with more than 120 different species and is native to Europe and Northern Asia. It was brought into North America by colonists and is now widespread throughout the United States.

Like the dandelion, it’s an invasive species that competes with native plants, but its invasive nature and nutritional value makes it an ideal plant to forage for use as a sustainable food source.

Back to Wild Edibles

Appearance

This is a creeping plant that stays low to the ground rarely reaching over 6-inches tall. All the creeping stems will develop from one central root. Purslane is succulent and has fleshy leaves and stems. The oval leaves grow out from the stem in a set of four and will be about the size of your thumbnail when mature. The leaves are bright green, have smooth edges, and are smooth to the touch. The stems have a reddish tinge of color.

The plant will produce purple or yellow flowers from mid-spring until late autumn.

Wild Growing Locations

This wild edible thrives in a wide variety of locations where it can grow undisturbed. The most common places to find wild purslane is along riverbanks, roadsides, vacant lots, open fields, and along the edge of a wooded area.

Flavor and Uses

The flavor of purslane is often described as a cross between a green apple and celery but with a bit more tart some compare it to watercress. The leaves can be eaten raw and are crunchy, or they can be boiled or steamed like any other leafy green vegetable.

The stems from young plants can be enjoyed raw in a salad. The stems of older plants might be a little tough and will need to be prepared like broccoli stems before eating.

Flower stalks and flowers are edible and have a flavor that is slightly sour and like salty vegetables.

Wild Purslane Nutritional Value

Purslane is a powerhouse of nutrients and is a must-have food source for the food forager, homesteader, or anyone else looking to increase their sustainable food source through foraging. This wild edible is a rich source of protein and heart-healthy omega-3 fatty acids. The plant also is rich in vitamins A, B, C, and E. It’s a good source of calcium, iron, magnesium, and several other micro-nutrients and minerals. The entire plant is naturally low in calories and sodium and will increase the nutritional value of any meal or snack.

Harvesting Purslane

Because of the plant’s rapid growth habit and invasive nature, pulling up a purslane patch will not be harmful to the environment. Even though the plant is invasive, it has naturalized to its environment and will re-grow from cuttings and seeds dropped from the plant. Additionally, birds and small animals that eat the plant help disperse the seeds. I find wild purslane growing in my vegetable garden every year.

The leaves and stems will be at their most tender flavor peak when the plant is young in the early spring. Harvest young plants when planning to eat them raw.

Grow Your Own

You don’t have to rely on foraging for purslane, it’s easy to plant and grow in a container garden or at the edge of the landscape. Remember, it’s an invasive plant and will need to be confined within a container or raised bed garden so it won’t overtake other garden plants. If you have a patch of vacant landscape where the plant can grow without interfering with other food plants, that will work very well.

Select a sunny location and sow seeds directly outdoors in spring as soon as the soil can be worked and when the danger of frost has passed. Cover the seeds with one-fourth inch of soil, gently tamp down, and water thoroughly. Don’t water again unless there is a prolonged period of drought. Don’t fertilize plants.

wild purslane is a great ground cover for the garden

Purslane can also be grown from cuttings quiet well. If you can cut stems close to the main stem with several sets of leaves that will be best. Cut the lower sets of leaves from the stem keeping at least two sets of leaves on the top of the stem. Stick the part of the stem stripped of leaves into a pot filled with rich moist potting mix. Keep the cuttings out of direct sun and the potting mix moist for several weeks

Poisonous Look-Alike

Spurges is a poisonous plant that looks like purslane but has one distinguishing difference – when the stem or leaves are broken it will ooze a sticky white substance. Spurges is also not a succulant so the leaves are thinner and the plant is hairy.

Broccoli Gardening

Broccoli Gardening

broccoli gardening Broccoli is a nutritious vegetable, high in dietary fibers, vitamins and minerals

Broccoli, Brassica oleracea var. Italica, belongs to the plant species Brassica oleracea, that also includes several other common cultivars including cabbage, Brussels sprout, kale, cauliflower, and collard greens. The short, thick-stemmed plant from the Brassicaceae family is native to eastern Mediterranean and Asia Minor. It’s a herbaceous annual plant grown for its edible flower heads. If you want to attempt broccoli gardening, you should know the plant grows to about 24 to 36 inches high with thick, branching leathery leaves, and dense clusters of flower heads, usually green in color. It’s a cool season vegetable that takes between 60 to 150 days for the heads to come to harvest, depending on the variety.

Types & Varieties of Broccoli

Broccoli is a nutritious vegetable, high in dietary fibers, vitamins and minerals. It’s an excellent source of potassium, folic acid, and Vitamins A, B and K. Though most superstores only sell a few standard types, there is a wide range of broccolis to grow and harvest for home gardeners.

Common Varieties of Broccoli:

BelstarThis hybrid variety produces 6-inch blue green heads that take about 65 days to reach maturity. Once the main crown is picked, the variety is also known for producing a series of side shoots for further harvests.

Blue Wind F1 – This is an extra early maturing variety, producing large dense heads that take about 60 days to mature. The side shoot production is also commendable.

Di Cicco – It’s an Italian heirloom variety that produces its initial crowns in as little as 50 days, followed by side shoots. The plants mature at different rates, making it an excellent choice for home gardeners, giving a consistent supply of broccolis to the kitchen.

Purple Sprouting Broccoli – With purple flower heads instead of the typical green broccolis, the variety is much sweeter than others. It matures slower than others and is typically planted as a biennial to harvest in the following spring. 

Broccoli yields 4 to 6 pounds from a 10-foot row. Space individual plants 18 to 24 inches apart, with a 3-feet spacing between rows and plan about 2 to 4 plants per person.

Temperature and Timing for Growing Broccoli

Broccoli is a cool-season crop that’s typically planted in late winters or early spring for harvesting in early summer. For broccoli gardening a second crop can be planted in late summers for a fall harvest. Broccolis grow best when the temperatures are between 40°F to 70°F. High temperatures negatively impact the development of the heads, so gardeners aim to bring it to harvest before the temperatures soar.

Sun Exposure and Soil Requirements

Broccoli prefers full sun but if the temperatures are higher, partial shade may be better to prevent the plants from bolting.

Broccoli grow best in rich, fertile soil amended with plenty of organic matter and with a neutral soil pH.

How to Plant Broccoli

Broccoli gardening begins by starting the seeds indoors, 6 to 8 weeks before the last spring frost. It can also be started by direct sowing in the garden, 2 to 3 weeks before the last spring frost. Work the soil with 2 to 4 inches of aged compost in early spring before sowing the seeds. When planting outdoors, sow the seeds ½ inches deep in soil and 3 inches apart.

Water the soil and maintain it consistently moist throughout the germination phase. Once the seedlings emerge and grow to a height of 2 to 3 inches, thin them to maintain an 18 to 24-inch spacing between the plants.

If started indoors, transplants can go into the garden after hardening off, once they are 4 to 6 weeks old. Plant the transplants 18 to 24 inches apart, setting them slightly deeper in the planting holes than they were in the containers. Water the transplants well just after planting.

Fertilize the transplants with a low-nitrogen formula 3 weeks after planting them in the garden. Provide 1 to 1.5 inches of water each week, maintaining consistent moisture for best development. Always water at the base and avoid getting the developing heads wet. Mulch around the plants to suppress weeds.

Harvest

Towards the end of a successful broccoli growing season, you’ll have plenty of beautiful flower heads to harvest. Here’s how to pick them:

  • Harvest the buds as soon as they’re the size of a large fist, while they’re firm and dense, just before flowering.
  • If you wait too long to harvest, the buds open and the quality of the heads fall. You can still eat them but the texture is tougher.
  • Cut the heads from the base with 4 inches of stalk attached.
  • Let the plant grow after harvesting the main head and side shoots will develop. The new flower heads will be smaller in size than the main head but taste just as good.

Storing

Broccoli stays fresh in the refrigerator for up to 5 days. Store unwashed broccoli loosely wrapped in damp paper towels in the fridge and consume them within the next few days. If you want to store it for longer, you can freeze it after blanching and use it for up to one year. 

Pests and Diseases

Pests

  • Aphids suck the plants’ sap, leaving curling and discolored leaves. Hose them off the plants with a strong jet of water. If the plants are severely infested, insecticidal soap or neem oil can help.
  • Cabbage worms feed on broccoli leaves, causing serious damage to the plants. If handpicking does not help, in the case of serious infestations, treating with Bacillus thuringiensis is typically effective.
  • Flea beetles leave small holes in the foliage, killing off the seedlings and reducing the yield for mature plants. White sticky traps can help capture the insects. Insecticides are also helpful if used early in the season.

Diseases

  • Powdery mildew is a fungal disease that appears as white patches with purple blotching on leaf surfaces. The thick powdery layer coats the leaves, causing them to eventually drop off the plant. If the disease persists, it spreads to the stem and head. Plant resistant varieties, rotate crops, keep the foliage dry and avoid using excessive nitrogen fertilizers to prevent the problem.

Applying all the information you’ve learned from this article, you’re ready to begin a successful and rewarding broccoli growing season.

Okra Gardening

Okra Gardening

Okra, Abelmoschus esculentus, is a herbaceous annual plant from the mallow family, Malvaceae, and is cultivated for its edible seed pods. It’s widely grown in most tropical regions of the world. Plants can grow up to 1.2 to 1.8 meters and typically survive only one growing season. It bears heart-shaped lobed leaves, and yellow flowers with a crimson center. You need to know that when okra gardening, this heat-loving vegetable crop grows through the warm season, coming to harvest by the end of summer. The fruit is picked and consumed while it’s young and unripe. Mature seed pods are tough for consumption.

Types & Varieties of Okra

Okra is rich in minerals, vitamins, antioxidants and fibers and low on calories, making it an excellent addition to your diet. Plenty of varieties are available, distinguished with their length of growing season, size of the plant and appearance and taste of the fruits. ‘Spineless’ varieties also exist that lack the tiny spines on the seed pods that irritate your skin upon handling.

Common varieties of Okra:

Annie Oakley IIThe plant grows to about 4 feet tall, maturing in about 52 days and bears spineless seed pods.

Clemson Spineless – These are the most popular varieties in markets and produce 4-feet tall plants, with a spread of about 48 inches. The variety matures in 55 to 60 days, giving ‘spineless’ fruit that can grow to 9 inches in length.  

Park’s Candelabra Branching – It’s a base-branching variety for easier harvest.

Cajun Delight – It’s a good choice for gardeners with shorter growing seasons since it takes only 50 to 55 days to mature. The plant reaches to about 4 feet tall, giving 3 to 5 inch long dark green seed pods for harvest.

In the ideal conditions, a single okra plant can yield 20 to 30 or even more seed pods. If you’re growing a self-sufficient garden, plan to grow 3 to 3 okra plants per person.

Temperature and Timing for growing Okra

Okra is a warm-season crop that’s planted 2 to 3 weeks after all the dangers of frost have passed in the region and the soil temperature is at least 60°F. The ideal growing temperatures range from 75°F to 90°F.

Sun Exposure and Soil Requirements

Okra grows best with full sun exposure for at least 8 hours a day. Plant it in fertile, well-drained soil that’s slightly on the acidic side, with soil pH between 5.8 and 7.0.

How to Plant Okra

Okra gardening begins when you start seeds indoors in peat pots 3 to 4 weeks before the last spring frost. Grow the seedlings under grow lights until they are ready to go in the garden 5 to 6 weeks later. Seedlings should be hardened off before transplanting them in the garden. Space the transplants 1 to 2 feet apart for optimal development.

Alternatively, you can start the seeds directly in the garden 2 to 3 weeks after all the dangers of frost have passed. Plant the okra seeds ½ to 1 inch deep in the ground, spacing them a foot apart in rows. Space the rows 3 to 4 feet apart to give ample room to the plants to grow. You can also plant the seeds closer together and then thin them once seedlings emerge.

Keep the planting bed well-weeded while the plants are still young and apply 2 to 3 inches of mulch around them to suppress weeds. Offer the plants 1 inch of water per week or more if you live in a very hot region. Side-dress the plants with aged compost every 3 to 4 weeks for best results.

Harvest

After a successful okra garden growing season, you can look forward to a hefty harvest. Here’s how to harvest okra:

okra gardening, this heat-loving vegetable crop grows through the warm season
  • Okra is ready to harvest in 2 months after planting the seeds.
  • Harvest the seed pods while they’re still young and tender. They should ideally be around 2 to 3 inches long for best texture.
  • Wear gloves when harvesting okra because most varieties have spines that may irritate the skin. Spineless varieties may be harvested without gloves.
  • Continue harvesting the pods every other day to boost further fruiting.
  • Cut the stem just above the pod with a sharp knife to harvest the okras. If the stem is too hard, the okra has matured beyond what’s suitable for consumption. Remove it from the plant and toss it.
  • Remove the lower leaves after the first harvest to speed up production of further seed pods.

Storing

Okra lasts only 2 to 3 days in the refrigerator. Wrap unwashed okra in paper towels or place them in a paper bag before storing in the fridge.

If you want to store for longer, transfer okras without cutting or cooking to freezer bags and place them in the freezer. When stored in the freezer in this way, they can last for up to a year. You can continue using them as needed through the winter months.

Pests and Diseases

Pests

  • Aphids are a common problem with okra plants and can be avoided by growing tolerant varieties. If the infestation is heavy, insecticidal soaps or horticultural oils are a good way to control it.
  • Corn earworms can infest the plants, causing damage to the leaves, buds, flowers and pods. Bacillus thuringiensis can help control these insects naturally.
  • Cucumber beetles may also affect okra plants, damaging the leaves and stems, leaving the plants susceptible to bacterial wilt. Adult beetles also feed on the fruit, leaving behind unsightly scars. Kaolin clay can manage smaller infestations, while you’ll need to use insecticides if the infestation is heavy.

Diseases

  • Powdery mildew often affects okra plants, causing the leaves to roll upwards and give a scorched appearance. Application of suitable fungicides can control the problem, especially in its early stages.
  • Yellow vein mosaic disease is a common viral disease that infects the okra plants and is identified by yellow and green alternating patches on the infected leaves. Fruits are also yellowish and smaller in size. Plant resistant varieties and keep the field weed-free. Once the plant is infected, it will have to be removed to prevent the disease from spreading to the neighboring plants.

Hopefully, with all the things you’ve learned in this article, you can start the perfect okra gardening season and enjoy loads of fresh harvests.

Carrot Gardening Information

Carrot Gardening Information for the Gardener

Carrots belong to the Apiaceae family, which also includes dill, cilantro, parsley, and celery. Though they’re biennial plants, carrot gardening typically cultivates the root as annuals, harvesting the long taproot at the end of the first season. If allowed to continue growing, they will flower and set seeds during the second year. Carrots produce a rosette of leaves above the ground and a long, fleshy taproot below the soil. Depending on the variety, the root can grow between 2 to 20 inches long, with a diameter of up to 2 inches. During the first year, the foliage typically reaches a height of around 12″. During the second year, when it flowers, the plant can grow as tall as 59 inches.

Types And Varieties

Besides being crunchy and tasty, carrots are nutritious vegetables. They are a good source of fibers, beta carotene, potassium, and antioxidants. Many different types of carrots exist, ranging in color, sizes, and shapes. Besides the orange-colored carrots you’re familiar with, yellow, white, red, and purple carrots also exist.

Common Varieties Of Carrots

  • Deep Purple Hybrid – This 7 to 8 inches long carrot reaches maturity in 75 to 80 days and comes in a deep purple color to make a bright addition to salads and dips. Though the unique hue runs all the way through the root, it will fade a bit when cooked, which is why it’s usually consumed raw. 
  • Little Fingers – Maturing earlier than others, this variety can be harvested in only 55 days. The miniature roots, up to 4 inches in length, feature an attractive orange color and are packed with sweetness.
  • Touchon – This is a sweet and tender heirloom variety that matures earlier than most others and is great for salads. The classic orange roots take about 65 days to mature, reaching a length of 6 inches.
  • Solar Yellow It’s a beautiful yellow heirloom carrot, sweet and crisp in flavor. They grow to about 7 inches in length, maturing in about 60 to 70 days from germination.

Carrots yield about 7 to 10 pounds for every 10-foot row. Grow about 30 plants for each person spacing them 1.5 to 2 inches apart in rows spaced at least 1 foot apart.

Temperature and Timing For Growing Carrots

Carrots are cool-season crops that are best grown in early spring and late fall. Day temperatures of 75°F and night temperatures of 55°F are best for their growth. You can sow the seeds outdoors 3 to 5 weeks before the last spring frost for a spring crop. Successive plantings can be continued until late spring for a continued harvest in the summers. For a fall crop, you can start planting 10 weeks before the first fall frost.

Sun Exposure And Soil Requirements

Though they can tolerate partial shade, carrots grow best when exposed to full sunlight. Make sure they get about 6 to 8 hours of direct sunlight each day.

Loose soil, sandy or loamy, is very important for carrot gardening to grow long straight roots. Work the soil before planting the seeds and remove any stones and debris from the area. Amend it with plenty of organic matter and compost.

How To Plant Carrots

Carrot gardening starts by sowing the seeds directly in the garden, 3 to 5 weeks before the last spring frost. Since they have long taproots, it’s recommended not to disturb them by transplanting. They are best planted in their permanent spot right from the start. Sow the seeds ¼ inch deep, spaced 1 to 2 inches apart in rows that are at least a foot apart. You can sow them closer together and thin them to 3 inches apart once they are around 4 inches tall. Cut off the top with scissors instead of pulling out the roots since they may damage the surrounding roots.

You’ll have to wait for around 2 to 3 weeks to see sprouting. Keep the soil moist during germination by sprinkling water frequently. Spread a thin layer of vermiculite over the soil surface to prevent it from forming a crust. Since the carrot seeds are very small, they’ll have a harder time sprouting if the soil forms a hard crust over them.

Provide about 1 inch of water per week during the first few weeks of development, increasing to about 2 inches per week as the roots approach maturity. Water the carrots deeply each time the soil dries out to a depth of 3 inches (you can check with your finger). Carrots follow the moisture into the soil, so if you water them deeply and less often instead of frequent, shallow watering, you’ll find long straight roots.

Keep the bed well weeded, but snip the weeds instead of pulling them so you don’t disturb the developing roots. Once the tops are 3 to 4 inches tall, you can fertilize the crop with a low-nitrogen fertilizer, such as 5-15-15. Excess nitrogen will promote green growth instead of favoring the roots.

Harvest

At the end of a successful carrot gardening season, you can expect a bright, flavorful harvest. Here’s how to harvest carrots:

  • Harvest the roots as soon as they reach the expected size. If you allow them to grow too big, they’ll start losing their flavor and will grow tougher.
  • Gently push away some dirt from the top of one of the carrots to check the size. Shey should be at least ½ an inch in diameter at the time of harvest. However, the exact size varies with the variety.
  • When growing carrots in spring, make sure you harvest them before the temperatures soar. High temperatures can turn the roots too fibrous.
  • For a fall harvest, let them stay in the ground, exposed to one or more frosts since it will enhance the flavors. If you want to keep them in the ground for harvesting later, spread several inches of mulch over them to keep them well protected.
  • When it’s time to harvest, loosen the earth around them and lift them gently out of the soil with your hands, taking care not to break the roots.

Storing

Cut off the excess foliage, leaving ½ inch attached to the top. Wash away the dirt and wrap it unpeeled in damp paper towels before keeping them in the refrigerator. Stored in this way, fresh carrots can last up to a month.

You can also keep them in the ground through the winters and dig them as needed unless the ground freezes over. However, if left in the ground all winter long, be sure to harvest them before spring when the tops resume new growth.

If the ground is expected to freeze during the winters, you can keep the carrots in the ground mulched with a 12 to 18-inch layer of shredded leaves, hay, or straw.

Pests And Diseases

Pests

  • Carrot rust fly is a common problem for carrot crops growing in temperate regions. The larvae dig through the roots eating the carrot and leaving unsightly holes on the surface. Install row covers at the time of planting before the adult fly has a chance to lay eggs around the plants.
  • Aphids are soft-bodied insects that can usually be spotted on the underside of leaves and are green or yellow in color. They secrete a sugary substance that promotes the growth of mold on plants. If the infestation is limited to a few leaves or shoots, you can prune them out to prevent spread to the surrounding shoots and plants. Insecticidal soaps can also be used to control spread.

Diseases

  • Alternaria blight is a fungal disease that appears as brown water-soaked lesions on leaves’ edges. Initially, the older leaves are affected, curling and eventually dying as a result. If the disease hits the crop at an early stage, roots are unable to reach maturity. Grow resistant varieties and avoid soaking the leaves when watering the plants to protect the plants from this disease.

With this article, you are ready to start a successful carrot growing season!