All posts by traderscreek

The Aberdeen Gun Club Inc

The Aberdeen Gun Club Inc

The Aberdeen Gun Club Inc was established in 1980 with 13 trap-houses equipped with automatic trap machines and voice-pulls, 1 skeet range and 1 5-Stand sporting clays range.

The Aberdeen Gun Club is committed to promoting firearms safety education by making the shooting sports available and accessible to all.

​Membership of the club is not required to shoot but it is encouraged. Funds from membership dues are used to help improve the facilities at the club and to keep the cost of shooting as low as possible. Individual, Family and Youth memberships are offered. Youth shooters are encouraged and shoot at a discount.

Back to South Dakota Shooting Range Listing


Check out South Dakota Gun Shows

They are affiliated with the Amateur Trapshooting Association and host several registered trap shoots during the summer. Some of these are competitive and marathons are thrown for shooters to register large amounts of targets during the year. Periodically, the Aberdeen Gun Club also hosts such shoots as the SD Northern Zone Shoot, the South Dakota State Shoot and the ATA Central Zone Shoot.

Address:
Aberdeen Gun Club Inc
38574 139th St
Aberdeen, South Dakota 57402

Contact Information:

605-228-2449

Website: https://www.aberdeengunclub.com/

Club Contact: https://www.aberdeengunclub.com/contact-1

Membership information: https://www.aberdeengunclub.com/membership-info-pricing

Back to South Dakota Shooting Range Listing
Check out South Dakota Gun Shows

Rosebud Arrow Rod & Gun Club

Rosebud Arrow Rod & Gun Club

The Rosebud Arrow Rod & Gun Club was established in the 1960’s & is a non-profit service organization dedicated to the promotion, expression, enjoyment and education of all indoor and outdoor sports including Small Bore Rifle/Pistol, Archery, Quick Draw, and Trap Shooting

Back to South Dakota Shooting Range Listing

Check out South Dakota Gun Shows

Address:
31592 W Oak Street
Winner, SD 57580

Contact Information:
Phone: 605-840-2687

Website: http://www.rargc.org/
Club Calendar: http://www.rargc.org/club-calendar.html
Membership information: http://www.rargc.org/membership-info.html

Additional Information:

Range Access:

The range is open to the public to shoot. Non Members will have a $5 fee

Facilities Include:

Indoor range:
The indoor range can accommodate either small bore (.22) rifle/pistol or archery. It has 6 gun lanes or 20 archery lanes with a 20 yard max distance. There are moveable targets for archery that can be set at shorter distances which gives shooters the ability to shoot from 5-20 yards indoors. They also have 3-D targets and conventional paper targets. Members can access the range 24 hours a day, seven days a week, with the secure key code.

Public (non-member) shooting is available at the indoor range FRIDAY NIGHTS for a nominal $4.00 fee per person. An RARGC board member is available at that time to answer questions and assist shooters.

Trap Shooting:
The trap range is located next to the outdoor range. There is open Trap shooting on Sunday afternoons at 2:00. Members shoot for $3.00 per round and non-member can shoot for $4.00 per round. 4-H Trap is on Monday nights at 6:00.

Outdoor Range:
The outdoor ranges are located next to the facility. The archery range has targets set at 30, 40, and 50 yards, as well as movable targets that can be rolled outside and shot. The outdoor gun range has a max distance of 50yds and target hangers in the trap shed. All targets and objects are owned by the club. The range fee helps to maintain the range and targets. Fees are posted and are paid at the time you come to shoot at the RARG Club to a board member.

Public (non-member) shooting is available at the outdoor range for a nominal $4.00 fee per person. A RARG Club board member is available at that time to answer questions and assist shooters. NOTICE: You must have a member present when you are shooting or you are trespassing

Rosebud Arrow Rod & Gun Club

Cabbage Gardening

Cabbage Gardening

Cabbage, made up of several types of Brassica, is a leafy green, red, or white colored biennial plant grown as an annual for its dense multi-layered leaved heads. The leaves are commonly smooth in texture, but crinkle-leafed savoy cabbages are also grown (my favorites). They weigh generally from 1 to 5 lbs. however there are varieties that grow much larger for. Cabbage heads are picked during the first year of the plant’s life cycle. Plants intended for seed are grown into a second year.

Cabbage contain the following vitamins and minerals:

Thiamine (B1); Riboflavin (B2); Niacin (B3); B5; Vitamin B6; Folate; Vitamin C and Vitamin K

Calcium; Iron; Magnesium; Manganese; Phosphorus; Potassium; Sodium and Zinc

Cabbage History

It is descended from the wild cabbage and belongs to the brassicas, meaning it is closely related to broccoli, cauliflower and brussels sprouts. Cabbage was most likely domesticated somewhere in Europe before 1000 BC. Savoy cabbage was developed around the 16th century AD. World production of cabbage and other brassicas for 2017 was 71 million tons, with China accounting for 47% of the world total.

Types of Cabbage

Green

Early Golden Acre; a northern favorite that is ideal for smaller gardens. Round and compact, their heads average 2-3 pounds of sweet flavor – Ferry Morse

Early Jersey Wakefield; favorite with a distinctly sweet flavor – Burpee

Red

Salad Delight; an early maturing red cabbage with a 3 lb. head – Burpee

Red Express; very nice color and early maturity, compact habit 2 – 4 lb. heads – High Mowing Seeds

Savoy

Perfection Savoy; heirloom green savoy – Hudson Valley Seed Co

Purple Savoy; Produces small, 1-3 pound heads, a bit later than other varieties – Hudson Valley Seed Co

Cabbage has been selectively bred for head weight and characteristics such as frost hardiness, fast growth and storage ability. The appearance of the cabbage head has been given importance in selective breeding, with varieties being chosen for shape, color, firmness and other physical characteristics.

Commercial breeding objectives are now focused on increasing resistance to various insects and diseases and improving the nutritional content of cabbage. Unfortunately, this means in too many cases GMO. In my opinion it is better to put up with pests and disease management than to grow anything GMO, I may be wrong but allowing scientists and others to create something that may very well be a plant-based-Frankenstein is unsettling.

Where to Plant

Cabbage plants can handle full sun to light shade, so at least 5 to 6 hours of sun. Since cabbage plants are not setting flowers or fruit, they do not need a full day of sun. Cabbage gardening in warmer climates will require some shade during hot months, so the plants do not dry out. If you can, rotate where you plant. Try to avoid planting where cabbage as well as other brassicas have been planted for at least 2 years.

When to Plant

There are cabbage seedlings available at every garden center in spring, but for the best variety you will need to start yours from seed. You can start seeds indoors, about 6 to 10 weeks before your last expected frost date. Cabbages can handle a little frost, so you can transplant seedlings outdoors close to your last frost date as long as the soil is able to be worked and if a hard frost is expected you can cover the plants. Just make sure that any plants started and grown under lights are given the time to acclimate to the sun before being planted into the garden.


How to Plant

Space plants about 2 feet apart in rows with approximately the same spacing. Later plantings can be direct sown in the garden for fall harvest.

Plant Care

Plants perform best when grown in well-drained soil. Different varieties prefer different soil types, ranging from lighter sand to heavier clay, but all prefer fertile ground with a pH between 6.0 and 6.8. For optimal growth when cabbage gardening, there must be adequate levels of nitrogen in the soil, sufficient phosphorus and potassium. Temperatures between 39 and 75 °F prompt the best growth, and extended periods of higher or lower temperatures may result in plants “going nowhere”.

Cabbage likes even moisture to produce good heads. Mulch with compost, finely ground leaves, or finely ground bark to keep the soil cool and moist and to keep down weeds. Water regularly, applying 1 to 1.5 inches of water per week (including rain).

Fertilize plants with a 10-10-10 fertilizer after they begin to develop new leaves and when they start forming heads.

Pests

Cabbage worms and cabbage loopers are the main pest threats. They will munch holes throughout the leaves. Their coloring allows them to blend in with the cabbage, but they can be handpicked easily if you can see them. If you see small white moths around your plants, try and kill them. Check under cabbage leaves for small white (extremely small) nodes – these are the cabbage moth eggs. Crush them!! If you see wasps flying around your cabbages – leave them be, they are hunting the cabbage moth larvae.

Slugs will also attack your cabbages as will cutworms. Spread diatomaceous earth around the plants base. The diatomaceous earth will kill the insects but will not harm the plant and to top that, it is organic.

Root-knot nematodes and cabbage maggots attack the plant below soil level and produce stunted and wilted plants with yellow leaves. Predatory nematodes are a good organic solution to these pests.

Rabbits can also become a problem. If you have rabbits around, fence or net your cabbage beds.

Diseases

One of the most common bacterial diseases to affect cabbage is black rot which causes lesions that start at the leaf margins and wilting of plants.

Clubroot, caused by the Plasmodiophora brassicae, results in swollen, club-like roots. If you have soil PH below 6.0 consider raising it with lime to 6.8 – 7.0, by doing so you may avoid the issues with clubroot.

Downy mildew produces pale leaves with white, brownish or olive mildew on the lower leaf surfaces.

Harvesting

For cabbage that head’s up check for “ripeness” by squeezing it. A head that looks solid and ready may still be flimsy and loose leafed on the inside. When it feels firm, cut the head from the base of the plant. I do let cabbages ready to harvest stay in the garden if I am backed up on work but ff a head cracks, cut it right away. When cabbage gardening is done and cabbages are harvested, remove the remainder of the plant. cabbage gardening lends itself to double cropping with other plants. After you clean up the bed try planting turnips, beets or spinach for extra crop. Heads will keep for several weeks in the refrigerator.

Leek Gardening

Leek

What is a Leek

The leek (allium porrum), a mild flavored member of the onion family, is a hardy biennial grown as an annual in the vegetable garden. However; unlike onions and shallots, leeks do not bulb, they are straight stalk plants. They are grown for their thick, juicy, mild flavored stems. The edible part being the lower stem.
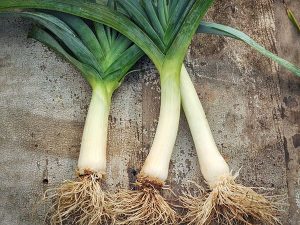
The leek is known as the gourmet's onion because of their mild flavorIf left in the garden, and if they survive winter weather, they will flower in year two and go to seed, as does parsley.

The top growth of leeks (the leaves), called the flag, are thick and strap like and are colored green to dark blue-green. The top growth does not die back as the plant matures.

Leeks contain the following vitamins and minerals:

Vitamins – Vitamin A, Thiamine (B1), Riboflavin (B2), Niacin (B3), Pantothenic acid (B5), Vitamin B6, Folate (B9), Vitamin C, Vitamin E, Vitamin K

Minerals – Calcium, Iron, Magnesium, Manganese, Phosphorus, Potassium

Leeks can require a long growing season—up to 170 days. They grow best in cool, mild weather.

They require little to no attention and are generally pest-free. In the kitchen, they can be substituted for onions. Leeks can be chopped and frozen for later use.

Types of Leeks

There are two types of leeks: short-season (non-hardy)and long-season (hardy).

Short-season leeks, also known as summer leeks, have thin stems. They mature in about 60 – 90 days and are harvested during the summer and early fall. They can be harvested and used like scallions when young. Summer leeks are not winter hardy and do not store as well as long-season leeks. Good varieties of summer leeks are:

Alto Leek early summer – High Mowing Seeds
King Richard Leek – High Mowing Seeds
Chinook Leek – Territorial Seed Company

Long-season leeks, also known as winter leeks, have thick, cylindrical stems. They take about 100 – 170 days to reach harvest. Long-season leeks are harvested late summer through the winter. They store well either inground or in cold damp sand. Good varieties of winter leeks are:

Bandit Leek – High Mowing Seeds
Tadorna Leek – High Mowing Seeds
American Flag – Ferry Morse

Where to plant

First, if you can, you should rotate the location of where you grow your vegetables – and that also includes leeks.  Try to move them to a new bed to avoid sections where they, onions or garlic have grown in the past year. This helps avoid the pests and diseases that can cause problems or ruin the crop.

Leeks like full sun, however, they do tolerate partial shade. Plant in well-drained soil rich organic soil with a pH of 6.0 to 6.8.

When to plant

Winter leeks take up to four (4) months to mature, if you live above zone 7, you should sow your winter leek seeds indoors in early spring. Start the seeds indoors about 2 – 3 months before the last expected spring frost – check the Plant Hardiness Zone Map

Transplant seedlings into the garden as early as 1 to 2 weeks before the last expected spring frost. Leeks should be in the garden no later than early summer for autumn harvest.  They will survive light frosts even when young — and heavy frosts in the fall.

If you live in planting zone 7 and warmer, you can plant winter leeks directly into the garden about the time of the last expected spring frost.

Summer leeks can be sown directly into the garden about the time of last spring frost dates.

Unused seeds can be kept up to 3 years.


How to Plant

First, mark your rows and remove the top 6 inches of soil in each row to create trenches. Space leek transplants 6 inches apart when planting. They grow best in temperatures between 55° and 75°F. Growth will be slowed by hot weather. Planting beds should have well-aged manure and compost.
Sow leek seeds ½ inch deep. They typically germinate in 10 to 14 days at 70°. When the seedlings reach about 8 inches, thin to 4 to 6 inches apart. Rows should be spaced 12 to 16 inches apart. Stagger the plants in each row so they are not uniform, this will allow the plants more room to grow.
As the plants grow you will need to use the removed soil to back-fill around the stems (you may fill in 2 -4 times during the growing season). This will blanch the lower stems that get covered. Blanched stems will be white and tender. Another way to blanch stems and avoid playing with dirt is to use leaves and grass clippings. I tried this in 2020 and it worked fine – it also kept the plants dirt free.

Plant Care

If you start your leeks indoors keep the tops trimmed  to about 4 inches tall to encourage stocky stem growth. When the weather is good, transplant into the garden.

Keep the soil around leeks evenly moist; water when the surface becomes just dry. Feed plants with compost tea or worm tea every four weeks during the growing season. If using normal fertilizing methods, you should spread 5-10-5 fertilizer every 3 to 4 weeks at a rate of 5 ounces of fertilizer per 10 feet of row.

Soil that tumbles into leaf folds can wind up trapped between skin layers in the stem. To keep this from happening you can slip a section of paper tube, such as from toilet tissue or paper towels, over the plants while they are still young as early as planting time. The tube will rot over the growing season but will help prevent soil from getting into leaf bases during early growth.

The closer together you plant leeks, the smaller they will be. Commercial growers usually place them about 6-8″ apart and don’t thin them. A good technique for home gardeners is to plant them just 2-3″ apart and achieve proper spacing by harvesting leeks as you need them. These young leeks are a good substitute for green onions in the kitchen.

After planting, mulch the bed with straw (I hate Straw) or other organic material (try shredded paper) to help soil retain moisture. Water plants as needed until they are established. Plants require an inch of water a week, either through rainfall or irrigation. Inconsistent moisture may cause tough stems.

Pests

On young plants, slugs can be devastating. Gather them at night, set traps, or use biological control.

Diseases

If there is a lot of rain in winter or early spring, leaf rot can set in. Rot shows as white spots on leaf tips that eventually shrivel. At this point there is not much you can do except pull the rotted plants and thin the planting to increase air circulation.


In summer orange pustules on leaves indicate leek rust, which is worse in wet growing seasons. Remove affected foliage; later maturing foliage will be healthy

Harvesting

You can pull leeks any time. Typically, you want them at least 1 inch or larger in diameter, but you can dig young ones to eat like green onions / scallions. Leeks have large root systems so use a hand fork or garden fork to loosen the soil before lifting the plants. A 10-foot row can yield up to 15 to 20 mature plants.

In colder areas, extend the harvest season by mulching deeply around plants (up to 1 foot deep). You can continue harvesting leeks but when a hard freeze is expected dig them up.

In zones 7 and warmer, you should be able to harvest leeks all winter long.

Storing

Initially, when harvesting leeks, shake and brush off as much soil as possible then rinse the plant thoroughly. To freeze leeks, wash, slice, and blanch for 1 minute in boiling water. Drain, drip dry, and toss into plastic freezer bags.

Store leeks wrapped in a damp paper towel in a perforated plastic bag in the refrigerator for 7 to 10 days. Smaller leeks store better than larger leeks. Trim the roots and wash the leaves and stem before refrigerating.

For longer storage in coldest zones, dig leeks with roots attached. Cut leaves back until just an inch of green remains on each leaf. Place stems in a box (root side down) and pack with sawdust, clean sand, or vermiculite. Keep the packing moist and store in a cool place. Stems will keep up to 8 weeks

Frost Date Maps

Frost Date Maps

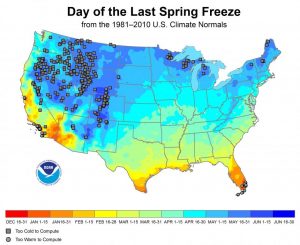
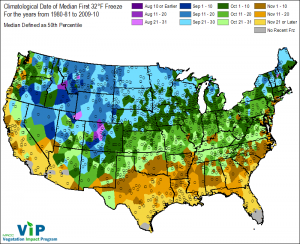
These Frost Date Maps Derived from the 1981–2010 U.S. Climate Normals—30-year averages of climatological variables like temperatures—these maps show the time of year, on average, that areas across the nation can expect to see their temperatures dip to 32°F or below for the last time. The map reveals some interesting regional differences across the country. In the East, the last spring freeze date generally progresses through time as you move northward on the map. However, in the West, the changes are much more complex due to elevation and coastal influences.Frost Date Maps

Wondering what happened to Alaska, Hawaii, and Puerto Rico? The unique climates of these regions pose a problem in calculating the average date of the last spring freeze. Nearly all of Alaska falls into the “too cold to compute” category, meaning that the state is likely to see freezing temperatures year-round. At the opposite end of the spectrum, all of Puerto Rico and all but the highest elevations of the state of Hawaii fall into the “too warm to compute” category, meaning that they very rarely or never see freezing temperatures.


For more information – go to National weather Service

Back to Garden Blog

Plant Hardiness Zone Map

Plant Hardiness Zone Map

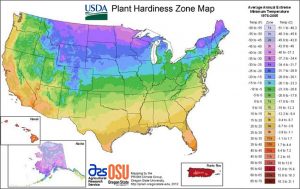
The USDA Plant Hardiness Zone Map is the standard by which gardeners and growers can determine which plants are most likely to thrive at a location, click here for the interactive map .

Plant Hardiness Zone Map

The United States Department of Agriculture (USDA) developed the first hardiness zone map in 1960, which has since been updated several times. The current USDA Plant Hardiness Zone Map, last updated in 2012, is based on 30 years of weather data collected from 1976-2005.

Plant hardiness zones are a useful tool for gardeners and horticulturists alike, helping them to determine which plants are most likely to thrive in their particular climate. A plant hardiness zone is a geographic area defined by its average minimum temperature during the winter months. These zones are typically divided into 10-degree Fahrenheit increments, ranging from Zone 1 (the coldest) to Zone 13 (the warmest).

For example, Zone 1, which includes parts of Alaska and northern Canada, experiences average minimum temperatures of -60 to -50 degrees Fahrenheit while Zone 13, which includes southern Florida and Hawaii, experiences average minimum temperatures of 60 to 70 degrees Fahrenheit.

Recently, each Zone has been categorized into 2 distinct “adjacent zones”. In general, the difference between adjacent zones is about 5°F. For example, Zone 7a has a minimum temperature range of 0°F to 5°F, while Zone 7b has a minimum temperature range of 5°F to 10°F.

Reading the Plant Hardiness Zone Map is relatively straightforward. The map is color-coded, with each color representing a different hardiness zone. You can find your hardiness zone by locating your area on the map and identifying the color that corresponds to that zone.

It’s important to note that the hardiness zones are based solely on minimum temperatures and do not take into account other factors that may affect a plant’s ability to thrive in a particular climate. Other factors such as soil type, rainfall, and humidity can all have a significant impact on a plant’s health and should also be taken into consideration when choosing plants for your gardens.

Back to Traderscreek.com Garden content table