All posts by traderscreek

Cauliflower Gardening

Cauliflower Gardening

Being part of the brassica family, Cauliflower (brassica oleracea) is a versatile vegetable. Its name comes from the Latin “caulis,” which means cabbage, and “floris” for flower. The first thing to know when cauliflower gardening is the “head” is actually a mass of flower buds. If allowed to go to seed the buds will become a mass of small yellow flowers (they actually look pretty and attract pollinators). It is an annual plant that can grow to 2.5 feet tall. The large, rounded blue-green leaves resemble collards. The leaves that grow above the curd (flower head) are often tied together over the curd prior to harvest to shade it and keep it from discoloring. Cauliflower has been bred to grow different color curds with great taste. The stems and leaves can also be eaten – although I do not.

Types & Varieties of Cauliflower

Cauliflower is rich in vitamins and nutrition. It contains Vitamin C & K, calcium, potassium, magnesium and antioxidants. Cauliflower has many variations ranging in size and color. Its heads are available in traditional white to orange, purple, and yellow and all have the same great taste – mild, slightly sweet, and nutty.

Common varieties of Cauliflower:

  • Veronica F1 – Favored for crudites and raw vegetable dishes. This cauliflower has northern Italian roots dating back to the 15th century and is a gourmet favorite today. Heads mature in 70-90 days from transplant.

  • Cheddar – Typically, orange, cheddar-like carrots contain beta-carotene and take just 60 to 70 days after transplant to mature.

  • Graffiti – With deep purple color, which turns blue when cooked, this cauliflower variety is heat resistant and matures in 70 to 80 days after transplant.

  • Steady – this variety is meaty and has outer leaves that wrap around the dense white curd and protects it naturally – no manual blanching.  Moreover, steady cauliflower favors a variety of climates, making it easier for you to grow.

  • The Goodman – With a nutty flavor and tender white florets, goodman is an early cauliflower with small, uniform heads. The plants reach maturity in 65 to 75 days after transplant

A 20 foot row should yield between 8 to 10 heads. If you are planning a “year-round” food supply, plant about 15 – 20 feet per person.

Temperature and Timing, for growing Cauliflower

Cauliflower is adapted to the cool-season; it prefers temperatures around 60 °F but will grow in an environment up to 80° F without much issue. In areas that have frosts, cauliflower can be grown as a spring or fall crop. In warmer areas with no expected frosts, it can be grown as a winter crop.

Sun Exposure and Soil Requirements

Cauliflower requires full sun to grow which means it needs at least 6 hours of direct light. If your garden can provide more – so much the better.

Cauliflower prefers well-drained soil with pH ranges between 6.0 – 7.5. Soil should be well-prepared and moist for proper growth.

How to Plant Cauliflower

Cauliflower gardening starts when you plant cauliflower seeds indoors 6 to 8 weeks before the last expected spring frost. Use a good seed starting mix and set 2 to 3 seeds in each cell 1/4 inch deep. Keep planting mix moist. Seedlings will emerge in 1 to 3 weeks. Make sure the seedlings have plenty of light. Learn how to grow vegetable plants indoors. When the seedlings have their real leaves transfer to larger seed pots – I use 3” wide pots for each seedling.

Before planting in the garden, seedling plants need to be “hardened off”. Set them in a safe space outdoors for about a week or so. What hardening is used for, in my estimation, is to get the plants used to direct sun and typical outdoor conditions. It is not to get them used to hard cold weather, if frosts are expected bring the plants back inside. Be careful the first few days the plants are outside making sure the sun does not scald the leaves – if that happens, the plants are likely to die.

Cauliflower transplants should be planted 2 feet apart in rows that are 2 – 3 feet wide.

Once transplanted into the garden, water adequately giving 1-1/2 inches of water per week. Never let the soil dry out for extended periods of time; that can affect the growth of the head. You can maintain a good moisture level by adding mulch.

Fertilize your cauliflower every 3 to 4 weeks with a well-balanced, 10-10-10, fertilizer.

Cauliflower does not like heat – over 80° F, when it’s too hot the plant can experience “buttoning,” where it forms several small heads instead of one large one. Conversely, hard frosts will kill the plant. Use row cover to prevent frost damage and shade cloth to protect your plant from heat stress.

Harvest

If your cauliflower gardening season went well there will be produce to harvest, here is how:

  • You can harvest plants in about 50-100 days from transplant, depending on conditions experienced and type of plant grown. Look for good compact curds approximately 6 – 8 inches in diameter with good color – if you would buy it in the store means your cauliflower is ready to harvest.

  • Depending on the variety, typically white curd varieties, you may want to tie leaves over the curds after the head emerges and can be seen to “blanch” the heads.
  • Use a knife to cut the head and leave some of the leaves for protection.

  • If you notice small heads that already started to flower, harvest immediately.

  • If Cauliflower shows coarse appearance, it has past maturity, it can be used but quality will be low.

Storing

Place cauliflower heads in plastic bags with a damp paper towel inside to store heads in the refrigerator. The head should keep 2 to 3 weeks this way.

You can also freeze cauliflower. To do so you will need to first cut the head into pieces, put into a pot of boiling water for a minute to blanch and then transfer to cold water to stop the cooking. Once cold, pat the pieces dry, put in a plastic bag and place in the freezer.

Cauliflower, just like cucumbers, pickle well.  

Pests and Diseases

  • Flea beetles are a common pest problem. They damage leaves by leaving numerous tiny holes in leaves. If the infestation is bad enough the plants can be killed. Two organic methods to control flea beetles are:
  • using floating row covers to protect the plants and
  • putting beneficial nematodes in the soil to attack and kill the beetle larvae.

  • Cabbage loopers and cabbage moths lay eggs and the larvae will eat holes in the leaves and flower heads which could potentially destroy the plants. Use Bacillus thuringiensis (Bt) to control them.

  • Aphids are small soft skinned insects that suck the fluids from the plants and can weaken them. Try spraying with water to dislodge the aphids. Organic methods include using ladybug larvae – they will eat the aphids, spay the leaves with insecticidal soap or carefully coat the leaves with neem or canola oil.
Disease
  • Club root – Caused by soil fungus which causes slow-growing cauliflower heads and wilting. You can prevent this disease by selecting resistant varieties and rotating crops.

  • Bacterial soft rot makes the head and leaves mushy and excessively wet. They may even start to ooze liquid that turns brown or black. There isn’t much to do about this disease except keep your plants healthy enough to prevent it. Keep the soil and plants clean and avoid getting the head and leaves wet. You should also practice good crop rotation with your plants.

  • Powdery mildew and downy mildew are common on cole crops, and both are annoying to resolve. Neem oil can help reduce their formation, but if they appear, a copper-based fungicide is your best bet for preventing further spread. Remove all infected material and treat until there are no signs of further infestation.

  • The cauliflower mosaic virus is transmitted by sucking pests such as aphids and thrips. There are no treatments for mosaic virus species, and prevention is your only protection. Keep pests away from your plants to avoid this deadly plant disease.

Hopefully this article will help in having a successful cauliflower gardening season – GOOD LUCK!!

Radish gardening

Radish Gardening

Radish gardening is simple. They are among the fastest growing vegetables in the garden. These roots have a spicy, peppery flavor and the greens are super nutritious and delicious. Planting can be as easy as dropping seeds among slower growing vegetables like carrots or broccoli or cabbage – the radishes germinate and identify the row before the slower growing plants emerge.

The crunchy spring variety includes:

Cherry Bomb – maturity in 22 days

Crimson Giant – maturity in 30 days

Burpee White – maturity in 25 days

French Breakfast – maturity in 26 days

Early Scarlet Globe – maturity in 26 days

Organic Sparkler – maturity in 26 days

Where to Plant

Choose a site that gets at least six hours of sun a day. Spring radishes are not a finicky root vegetable. They do like full sun when the weather is cool yet will handle some shade when it’s warmer.

Because they are quick to sprout, simply sow them in any empty spaces in a bed.

Planting

Radish gardening - do not plant the seeds too deep

Since radishes like it cool and they grow fast, they are not candidates for starting in flats and transplanting. As soon as the garden’s soil is workable in the spring, you can plant a first sowing. Plant additional rows through early May for your spring crop. Autumn planting can begin again August 1 through September 1 for harvests into October and November.

Till the soil to a depth of at least eight inches, then make furrows about six inches apart and plant the seeds at a depth of about 1/2 inch and cover loosely with soil or peat moss (anything that will not clump up and make it difficult for the seeds to sprout). Allow about one inch between seeds in the row then thin to 2 inches as they mature.

Do not cultivate too deeply or you may damage the roots. Use a hand tool or a hoe and cultivate just deeply enough to cut the weeds off below the surface.

Sunlight and Soil Requirements

As previously stated, choose a site that gets at least six hours of sun a day. For the best radishes, plant them in a friable soil when the weather is cool and provide constant moisture. Any well-drained, slightly acidic to neutral soil with pH 6 to 7 will do for radishes. An overly rich soil will encourage lush foliage at the expense of crisp, tasty roots. If the soil is too dry, radishes may bolt and become pithy and too pungent to eat. If too wet, the roots will split and rot.

Succession Planting

Make small weekly sowings, trying different varieties to obtain a wide mix of radishes. Because most spring varieties mature in less than a month, succession plantings ensure a steady supply of radishes. When warm weather (65 degrees or higher) arrives, stop sowing as radishes will not tolerate heat and will rapidly go to seed. However, in late summer, you can start planting again for an Autumn harvest.  

Harvesting

Although radishes are easy to grow, when radish gardening knowing to harvest is the key to perfect radishes with crisp roots and mild flavor instead of hot as fire and as pithy as corks. Garden radishes are usually ready for harvest three to five weeks after planting. You can pull them any time they reach a usable size. They will get fibrous and develop a strong taste if left in the ground too long. Remove greens and wash roots well.

Problems

The worst invader of the radish patch is the root maggot. Luckily, this pest is easily avoided with a proper crop rotation. Never plant radishes in a bed that contained a cole crop in the last three years. If you incorporate some wood ashes in the soil, the maggots shouldn’t present a problem.

Flea beetles make tiny holes in the leaves, slugs and snails chew grooves in perfect roots, and a sudden deluge can cause radishes to split and start rotting.

Elderberry – Wild Edible

Elderberry – Wild Edible

Elderberry is a native shrub like plant that attracts birds, butterflies and wildlife. It is a prolific plant that can reproduce from seeds, sprouts, planted branches, and root suckers.  It does require stratification at 36-40 degrees F for two months for spring planting.

Back to Edible Plants

Common Names

Arizona elderberry, American elder, sweet elder, wild elder, flor sauco, tree of music, Danewort, Walewort, New Mexican elderberry, velvet-leaf elder, hairy blue elderberry, and dwarf elder. 

Description

Elderberry is a shrub like plant that grows 10 ft- to 15 ft tall.

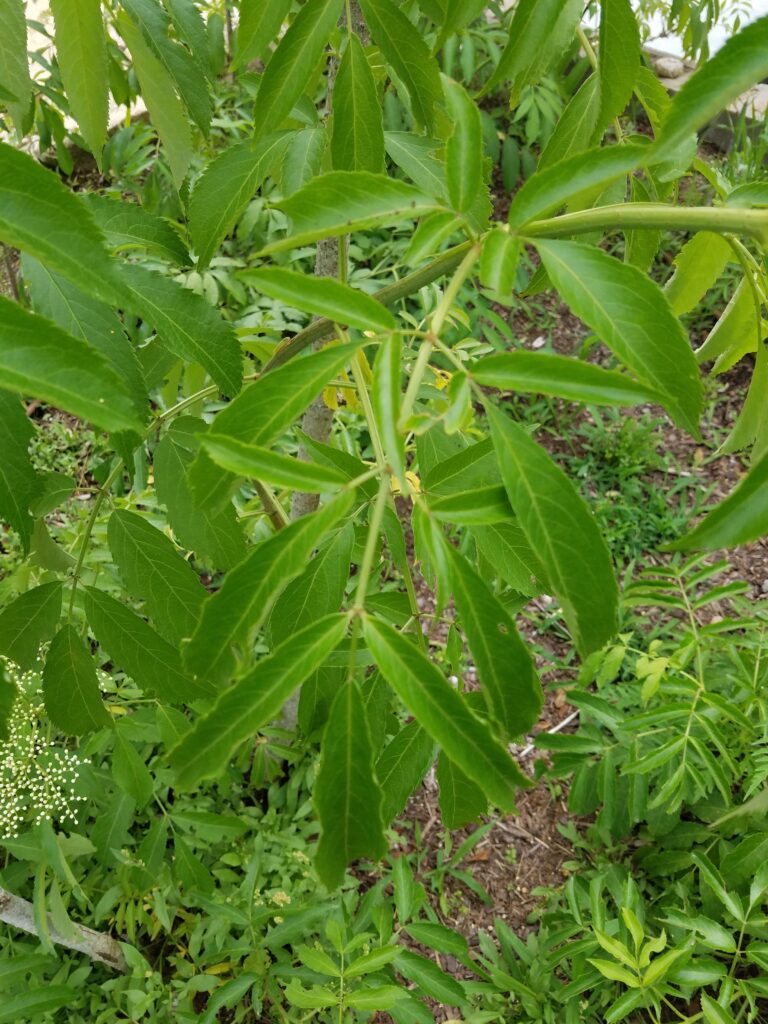
The plant’s compound leaves are set oppositely in pairs. The leaf surface is bright green.  They are oval to lance-shaped leaflets are up to 6″ long and 2 1/2″ wide and have finely serrated margins.  They are abruptly narrowed at the tip and lopsidedly narrowed or rounded at the base.  Leaflets are usually held on short stalks.

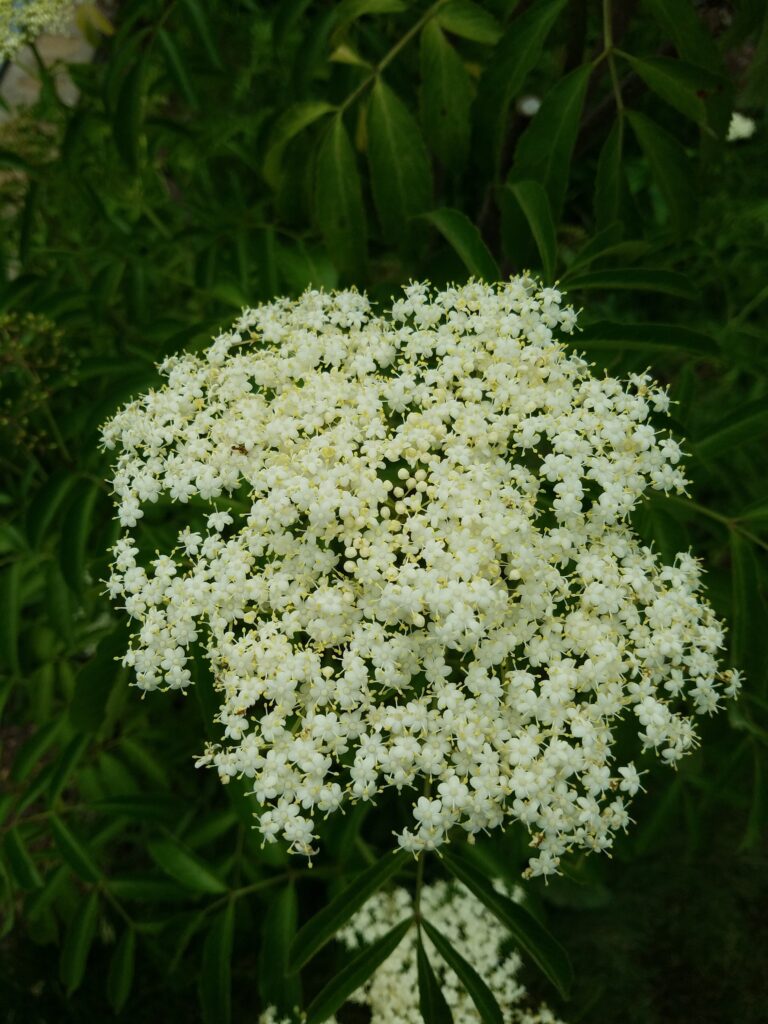
elderberry - wild edible flower head
elderberry flower head in June Location was Martha’s Vineyard

Flowers open in early summer as small white, roughly ¼ inch each, flowers borne in large, flattened clusters measuring 4″-10″ across. Flowers usually develop in the second year on older canes and are arranged in branched clusters of 5.

Purple-black round fruit appear in late summer and fall. Individual berries are less than 1/4″ across grouped in large clusters. Each berry contains 3-5 small seeds. 

Range & Habitat

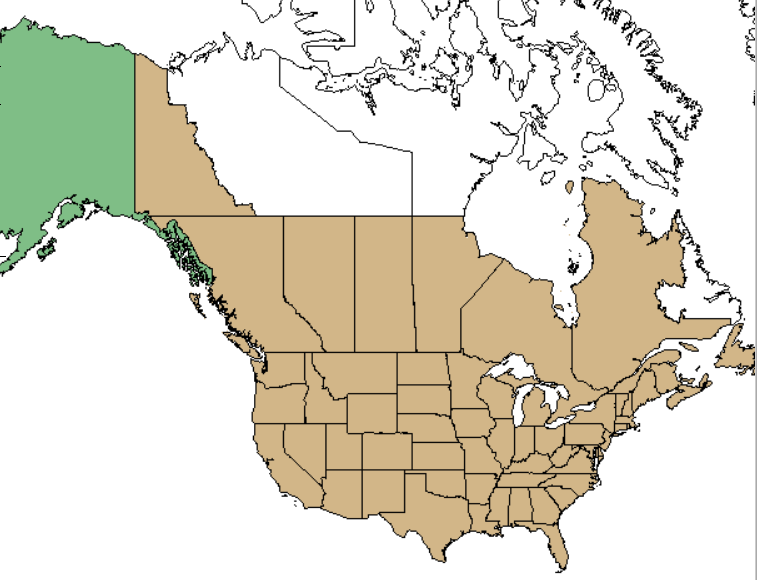
elderberry map showing the North American areas this native plant family can be found

As the map indicates, some form of elderberry can be found throughout the US and Canada – from California and all western states, south into northwest Mexico, north to Canada and to the North American east coast.

Elderberry grows on moist, well-drained sunny sites, usually occurring in groupings in moist areas and moist areas within drier, more open habitat. You can find them around streams, open areas with access to moisture.

American elderberry prefers slightly acid soil bordering streams, and in the adjacent bottomlands.  It likes full sunlight.

Harvest

Elderberry fruit normally matures between mid-August and mid-September and turn a dark purple when fully ripe.

The easiest way to harvest elderberries is to use scissors to snip the entire cluster from the shrub and then remove the berries from the cluster.

The annual average yield per plant is 12 lbs. -15 lbs.

Storage Refrigerate immediately after harvesting or freeze for later use.

Edible

Elderberries right off the bush are usually tart. You should not each too much raw though

elderberry leaves

The berries are gathered and made into elderberry wine, jam, syrup, and pies.

The entire flower cluster can be dipped in batter and fried while petals can be eaten raw or made into a fragrant and tasty tea.

The flowers add an aromatic flavor and lightness to pancakes or fritters.

Interesting Facts

At least 50 species of songbirds, upland game birds, and small mammals eat the fruit of American elder during summer and early fall as do the White-tailed deer that browse the twigs, foliage and fruit during the summer.

American elder is a nesting cover for small birds.

American elder can be used for erosion control on moist sites.  It pioneers on some strip-mine spoils and may occasionally be useful for reclamation planting. 

Elders can be propagated from 10” to 18” hardwood cuttings taken from vigorous one-year-old canes in which cane each must include three sets of buds. 

Edible berries and flower are used for medicine, dyes for basketry, arrow shafts, flute, whistles, clapper sticks, and folk medicine. 

Elderberries are high in Vitamin C. 

The wood is hard and has been used for combs, spindles, and pegs, and the hollow stems have been fashioned into flutes and blowguns. 

Elderberry branches were used to make the shaft of arrows. 

Birds and other animals disperse seeds as they poop them out after feasting on the fruit. There are about 230,000 seeds per pound.

There are several look alikes you should be careful of. The first is pokeweed, the second is devil’s walking stick and the third is poison hemlock. Learn to identify the differences – especially poison hemlock since eating that by accident will kill you.

Back to Edible Plants

USDA plant guide

Spinach Gardening

Spinach Gardening

General

Spinach Gardening is growing a cool-weather crop that if handled correctly will produce in the garden. The plant prefers a more alkaline soil – keep that in mind. If allowed to grow into the hot weather of summer with its longer days it may bolt – go to seed.

Spinach seed does not store well so you should not keep for more than a few years, I have had seeds germinate after two years but the seed will lose its virility quicker than other seeds – or so I believe.

Back to Garden Index

Types/Varieties

There are both smooth-leafed and dimpled or savoy-leafed spinach varieties. Different varieties are grown by many seed companies including Burpees (my favorite) and High Mowing Seeds (A very close second)

Where to Plant

Select a planting site with full sun (at least 6 hours) and well-drained soil.

Planting

Spinach gardening is pretty easy, just make sure you have good PH, and watch the temperature

I have read that spinach plants don’t do well when transplanted. I have grown them both ways (direct sowing and transplanting) without much headache. Sow spinach seed as soon as the soil can be worked; however, if the weather turns cold or wet, the risk of having nothing sprout or a prolonged germination period may happen.

Sow seeds 1/2 inch deep and two inches apart in rows 12 inches to 18 inches apart. One ounce of spinach seed should be enough to plant 100 feet of row. If conditions are good the seeds should germinate in about 1 to 2 weeks. As the seedlings emerge, thin to about 3 inches apart. When the plants become large enough that they touch each other, pull every other one to give the plants some space (eat what you pull) since overcrowding stunts growth and encourages plants to go to seed. If you want, at this point apply some 10-10-10 fertilizer around the plants at the rate of 3 ounces for each 10 feet of row.

Sunlight and Soil Requirements

Spinach does best when growing in moist, nitrogen-rich soil. Plants prefer soil pH of between 6.5 to 7.5. Spinach does not do well in acid soil. If necessary, add calcium to your soil around the spinach plants.

Care

Water the new seedlings well in the spring.
Roots are shallow and easily damaged so do not use garden rakes around the plants
Keep soil moist with mulching.
Spinach can tolerate the cold; it can survive a frost
Cover the crop with shade cloth if the temperature goes above 80 degrees.

Succession Planting

In the north, sow seeds weekly in the spring until 6 weeks before average daily temperatures are expected to be over 75°. In late summer, as soon as temperatures average below 75°, start weekly sowing until 6 weeks before temperatures are expected to start dipping into the 20’s.
In the south grow spinach as a late autumn to winter crop or late winter to spring crop and use the same temperature parameters described above as a planting guide.

Harvesting

In six weeks to eight weeks, start harvesting any plant that has leaves 6 inches to 8 inches long. You can harvest the entire plant by cutting at the soil surface.

A good crop would be 3 to 5 lbs. per 10 feet of row. If you are a “12 month gardener” you will want to plant about 10 feet to 20 feet of row per person. The leaves contain iron, calcium, and vitamins A, B, and C

Problems

Spinach blight, a virus spread by aphids, causes yellow leaves and stunted plants.

Downy mildew, which appears as yellow spots on leaf surfaces and mold on the undersides, occurs during very wet weather. Reduce the spread of disease spores by not working around wet plants. Avoid both of these diseases by planting resistant cultivars.

Leafminer larvae can burrow inside leaves and produce tan trails (these are my biggest problem).

Slugs also feed on spinach.

Back to Garden Index

Indian cucumber Wild Edible

Indian cucumber

Back to Edible Plants

General

Indian cucumber Wild Edible

Indian cucumber is a member of the lily family and can be found in Eastern North America. It grows from seed and spreads by rhizome. It is a long-lived perennial that has been over harvested for many years in certain areas so, please do not harvest unless it is an urgent food need or if it is legal in your area. The plant does lend itself to domestication so if you do find a small plantation of Indian cucumber in late autumn take a few seeds or better yet order online.

Common Names

Indian cucumber-root

Description

Indian cucumber is a member of the lily family

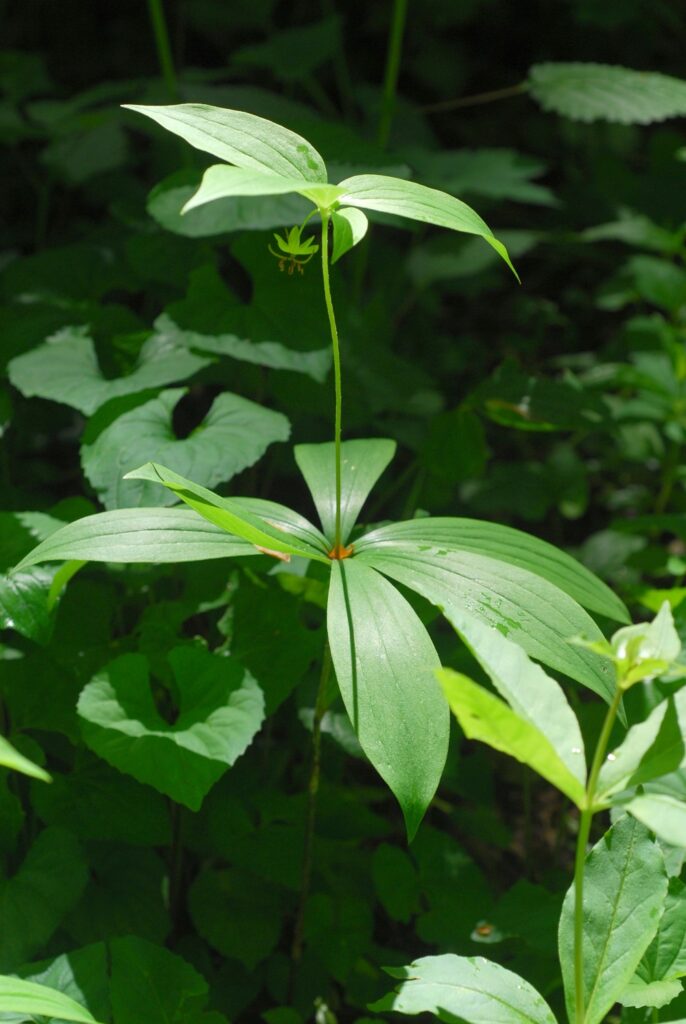
Stems have two tiers of whorled leaves when mature and ready to flower. The lower tier typically bears between five and nine lance shaped leaves. The second tier is produced when the plant flowers and consists of approximately three to five leaves. When the plants are mature and have the second set of leaves, they will be approximately 30 inches tall.

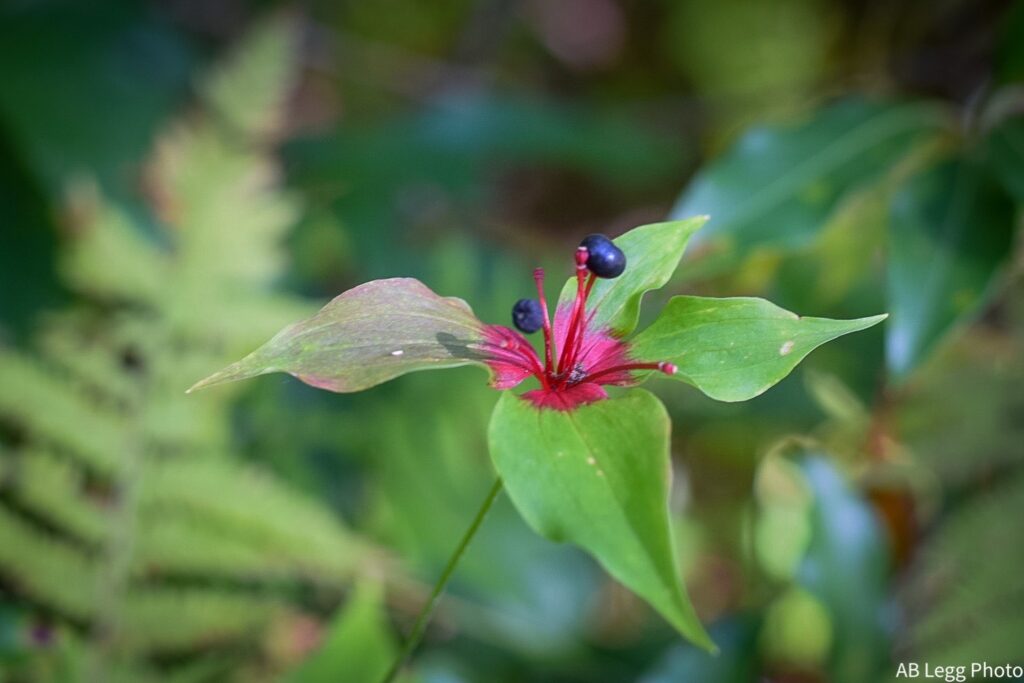
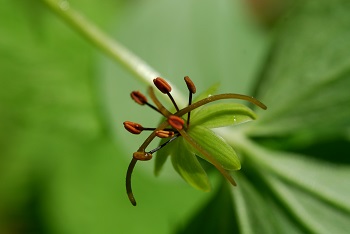
Indian cucumber flower

The green leaves are hairless and have an entire smooth edge. Their size is between 3 inches long (upper) – 6 inches long (lower). Since this is a deciduous plant, leaves will turn purple/red to lavender in the Fall.

The flowers, about 1 inch wide, have yellowish/gold – green coloration and are somewhat trumpet like. They appear in late spring into summer and typically point downward like wild onion flowers – they “nod”.

The 1 inch berries are dark blue to purple and appear above the top tier of leaves. The berries mature in early fall.

Range & Habitat

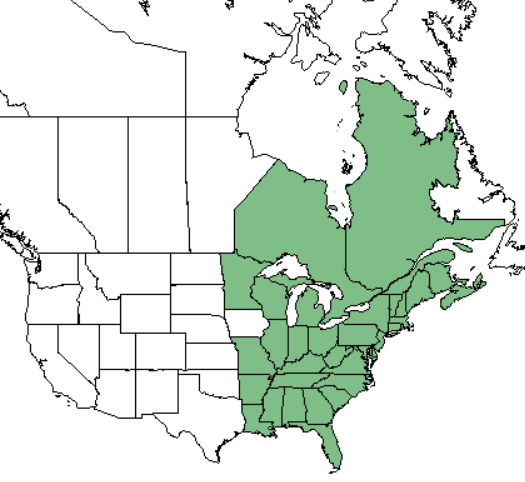
Indian cucumber range map

As the map indicates, Indian cucumber grows from Ontario south to Louisiana east to Florida and north into the Canadian Maritimes.

Indian Cucumber-root is found in hardwood, conifer, and mixed wood forests throughout its range. It grows in shade or partial shade on moist, well drained slopes.

Harvest

The berries are not edible. The root which is choice may be harvested at any time. It is not overly large and will fit within the palm of your hand – so to have a meal you need several. It may be eaten raw or cooked.

Edible

The plant bears edible roots (rhizomes) that have a mild cucumber-like flavor. They may be eaten raw or cooked like root vegetables.

Look a-Likes

Starflower, which is not edible, has similar leaves, but the leaves are only on one level. Also, Starflower has small white flowers that don’t hang down.

Whorled Pogonia – poisonous, but root is different

Interesting Facts

It is listed as an endangered plant in Florida and in Illinois.

Iroquois used the plant both as food and a medicinal herb.

Back to Edible Plants

USDA plant guide

Poison hemlock Identification

Poison hemlock Identification

Back to Poison Plant Guide

General

Poison hemlock is a biennial plant – it typically has a two year life cycle. First year plants are low-growing and may resemble carrots. They can be distinguished by the lack of hairs on the stems along with purple-reddish blotches. Second year plants may stretch over 10 feet tall.

Poison hemlock was brought to the United States from Europe as a garden plant. It took a bit less than a few centuries for this noxious plant to populate the North American continent. Just another case of poor thoughts and dire consequences.

Common Names

poison parsley, spotted corobane, carrot fern, devil’s bread and devil’s porridge

Description

Poison hemlock stems are hollow and hairless. They are green with reddish or purple spots and streaks.

The triangular leaves are green and look like fern leaves. They are toothed on edges and have a strong musty odor when crushed.

Flowers grow on second year plants. They have 5 petals that are tiny and white – approximately 2 to 3 inches across. They are arranged in small, umbrella-shaped clusters on ends of branched stems – much like Queen Anne’s lace. Flowers are followed by green ridged seed cases that turn brown as the seeds mature.

Range and Habitat

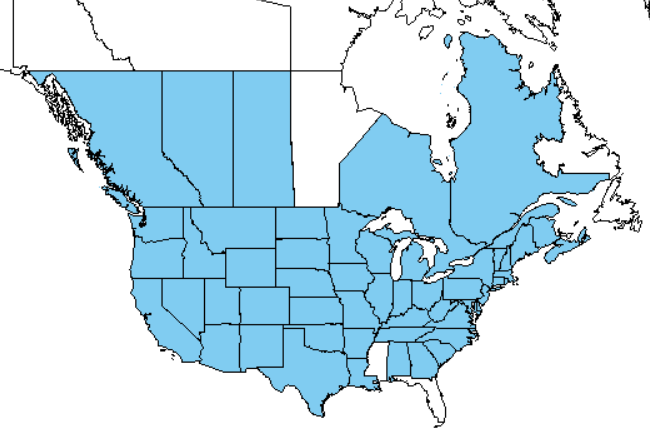
As the map shows, poison-hemlock grows throughout the United States.

It likes sunlight and grows along fence lines, in irrigation ditches, and in other moist waste places.

Poison Parts

Poison hemlock range map across North America

Poison hemlock is acutely toxic to people and animals, with symptoms appearing 20 minutes to three hours after ingestion. All parts of the plant are poisonous and even the dead canes remain toxic for up to three years. Eating the plant is the main danger, but it is also toxic to the skin and respiratory system.

The seeds and roots are toxic. Roots of poison-hemlock are poisonous and may be mistaken for wild parsnips.

Poison Effects

The typical symptoms for humans include dilation of the pupils, dizziness, and trembling followed by slowing of the heartbeat, paralysis of the central nervous system, muscle paralysis, and death due to respiratory failure

Toxic Look-alikes

Poison hemlock Flowers grow on second year plants. They have 5 petals

Water hemlock stems may have purple spots, but leaves are not lacy. Highly toxic to humans and livestock.

Giant hogweed, which can cause severe blistering and swelling when the sap contacts human or animal skin, stems may have purple spots, but its leaves are not lacy.

Queen Anne’s Lace has lacy leaves, but stem has hairs and does not have purple blotches.

Wild parsnip does not have purple spots on the stem. Wild parsnip can cause severe blistering and swelling when the sap contacts human or animal skin.

Interesting Facts

Socrates is the most famous victim of hemlock poisoning

Back to Poison Plant Guide

USDA plant guide