Starting Gardens using Seeds
Growing your own food is both cathartic as well as an environmentally conscious endeavor. Starting gardens using seeds takes gardening to the very root of the process. By taking it upon yourself to raise your own “crops”, you will know exactly what has gone into & onto your food. I have been gardening most of my life, sometimes having unbelievable years with excess so much that canning and preserving became a nightmare while in other years I scratched my head trying to come up with an answer to that year’s failure. I try to grow “as organic as possibl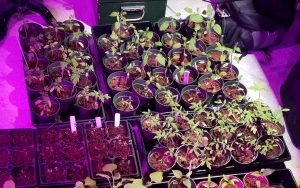 e. I fight the pests and weeds as organically as possible. When the garden starts to produce and we eat the first tomato or pepper, knowing it is clean of harmful synthetic chemicals is comforting. Also knowing the food came from 200 steps away and not 2,000 miles away along with the associated costs is well, rather satisfying.
A few years back I decided to venture out and try varieties that could not be bought at the local commercial greenhouse. Tomato varieties such as Cherokee purple and yellow pear were not offered yet they are our favorites. Buying pre-started beets were more expensive than just buying produce from the local supermarket. I also want to know what the heck I am growing and eating. The goal was heirloom, organic and nothing GMO. In order to do that I had to plant my own seeds.
There are a lot of articles out on the web today about starting seeds and the ease of doing so. I recently read an article that soft pedaled the process, and in my opinion, got it wrong. Frankly, it is easier to go to the local greenhouse and buy a flat of whatever and plant than it is to start your garden with seeds. If you decide to buy plants, you will be limited to the varieties and types of vegetables you grow but you will have less sweat in the game. Going down to the store and choosing packets of seeds is easy (and fun) but you are just at the beginning of a long process. Considerations such as where to house the seedlings, the amount of space needed, planting medium, temperature, humidity, time and lighting should be thought out and handled before you ever plant your first seed.
Housing your plants & space
Before you buy the first packet of seeds, a plan needs to be made as to where your plants will be housed. Considerations as to space:
Do you want 5 plants or 100? You will need to plant more seeds per type of plant then you will end up putting out into the garden. Plan for seeds not sprouting, seedlings dying and seedlings that will not grow. My rule of thumb is, plant 1 ½ times more then you need. Your space considerations should take this into account.
Will you use stand-alone individual containers, or will you use seed trays? For corn I go with large containers right from the start. I plant the seeds in mid-April and move them to the garden in late May. Beans are started in late April in small flats and then moved to the garden in late May, same goes for cabbage, cucumbers, squash, etc. Tomatoes, peppers and eggplants are started in small flats in early March, right after they set their first true leaves, I move them into 2” x 2” cups before ultimately going to the garden in very late May. Spinach, beets, carrots and onions are planted straight into the garden.
Do you have enough containers? If you want ten good tomato plants – plant 45 seeds in 15 cups (15 cups being the 1 ½ times rule). Expect 8 seeds to be crap, 4 seedlings to die and 8 seedlings to be just garbage. That would leave you with twenty-five plants to choose your ten from (quick note, you want to get to 1 plant per cup, you will need to pull extra seedlings – be merciless). If the seeds all sprout, and you are like me, you can care for them, plant them in individual pots and at the end – share any excess plants with family and friends.
Is the space you are thinking of warm enough? In my first shot at starting seeds, I planted in my basement. The temperature was in the high 50’s. The tomatoes, peppers and eggplants did not spout for 3 weeks. I finally moved them upstairs and they sprouted within a week. I moved them back to the basement and the cold temperature on those warm weather vegetables stopped their growth. They went into the garden in late May and did terrible – word of warning.
Is there an ability for fresh air and/or air movement? Stagnant air can potentially lead to disease (damping off) and/or unhealthy plants. The ability to bring in fresh air or at least moving air, in my opinion, is good. If you use a fan to move air within the plant nursery, the airflow will help move stale air away along with the added benefit of making the plants a bit hardier & stockier.
Are there ample electrical outlets available? – yes you will need electricity. You will need electrical outlets for lighting. Being able to use fans is good (see above). If the area is cold, you will want to use a heater to raise the temperature.
If the seedlings turn to small plants before you can get them outside and into the garden, do you have larger containers they can be replanted in and is the space large enough to handle the larger containers needed?
Planting medium
You can, but you should not, use soil from your garden to start your seeds. Garden soil is usually heavy and may have lots of little critters, organisms, fungus, etc., issues you really do not want to deal with when starting your seeds. There are a lot of seed starting soils on the market today and most are good. The best are light mixes, vermiculite and peat along with other stuff. They will hold moisture, are lite enough for the seeds to sprout without too much wasted energy and are proper PH (proper PH is very important). If you want to create your own starter soil try: 80% vermiculite and 20% potting soil.
Temperature
As mentioned before, if you plant warm weather seeds in a cold area expect little to nothing. Articles note that tomato seedlings cannot process nutrients correctly in cool conditions. Most gardeners want summer vegetables and that means a warm “nursery”. Try to make the area around 70°F. You can spend the money on heat mats – they do work, I have one that I use to give tomato and eggplant seeds an extra bit of care. The mats are an added expense and … require electricity. The better choice is a space heater – not a crap one that will catch fire but a decent one that has good temperature control and is powerful enough for your nursery space. Remember when starting seeds, you need to do it right.
Lighting
Unless you have a greenhouse and can provide roughly 8 – 10 hours of sunlight each day, you will need lights. As everyone should know, normal house lighting will not do a good job, they will work but your seedlings will not get what they really need. House lights do not provide the full spectrum of light waves that seedlings and plants need to flourish. My first “grow lights” were florescent tube full spectrum grow lights – the setup was expensive. Today there are LED’s that can be bought cheaply, and last much longer than florescent tube lights, on Amazon that can be put into any house-light fixture. 2 – 4 lights and you have a well-lit nursery for your seedlings.
Moving your plants outdoors
When the time comes, and it will be different for each variety of plant, you will set the young plant out to “harden up”. This is not so the plants are acclimated to the temperature – do not even think of doing that. Putting tomato plants, etc. out into 50°F days are 40°F nights will only stop their growth, so much so that the plants will have a tough time getting back on track. All the work you did will end up for naught. Moving the plants out should be done at each type’s ideal temperature. When starting gardens using seeds, the hardening is for the plants to get used to the direct sunlight. Plants cannot go from a “grow light” environment directly into sunlight. Too often the plants and their leaves are not ready – too much sunlight too soon can burn the leaves and kill the young plants. The best way to harden off the plants is a week-long process such as:
Day 1 & 2 – put plants in direct sunlight for no more than 2 hours. Remainder in shade or back under the grow lights. IF THE plants look good
Day 3 & 4 – put plants in direct sunlight for 3 hours. Remainder in shade or back under the grow lights. IF THE plants look good
Day 5 & 6 – put plants in direct sunlight for 4 hours. Remainder in shade or back under the grow lights. IF THE plants look good
Day 7 & 8 – put plants in direct sunlight for 6 hours. Remainder in shade or back under the grow lights. IF THE plants look good – plant them.
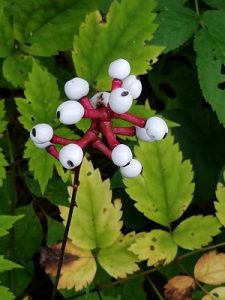 aves are toothed at the edges and are also compound. They are roughly 16 inches long and 12 inches wide. The leaves grow alternately on the stem – this means one leaf comes out at a time on the stem.
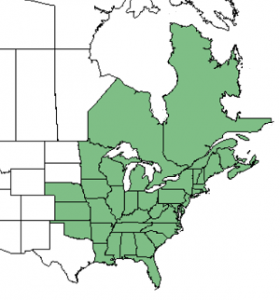 matter in partial to full shade. White baneberry is an upland plant and almost never occurs in wetlands. The picture of the plant with berries was taken in the Southern Adirondacks in a deciduous forest border facing south above a small lake.
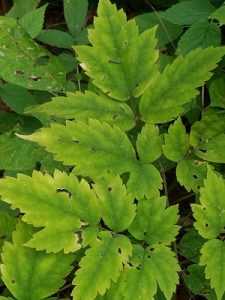 eat the berries, the entire plant, just like Climbing Nightshade, is poisonous including the leaves, stalk, and especially the berries. If eaten, symptoms include nausea, vomiting, cramps, mouth blisters, confusion, and headache. The plant’s poison also has cardiogenic properties and can cause cardiac arrest (heart attack) in in children and immune compromised adults. This is a plant best admired for its beauty and left alone.
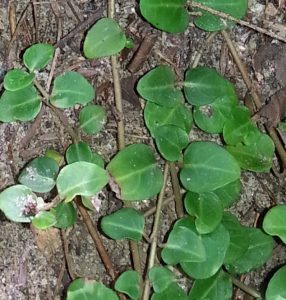 creeping stems 16 inches long. It blooms from late spring to mid-summer and sets berries that typically turn red when mature. Partridgeberry is highly ornamental and is used in gardens and landscaping. It is easy to find on online
 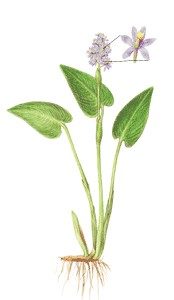 of stems and are highly variable in shape and size. Leaf shape ranges from an oval to almost lance shaped. Leaf sizes are also variable, ranging from as small as 2 inches to as much as 10 inches long and from less than an inch up-to 6 inches wide. Leaf veins run parallel in the leaf and are never “net-like”.
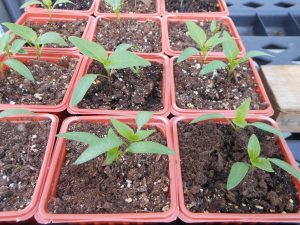 may produce a “mixed bag” harvest. The harvest may come in less predictably, and fruit size can vary greatly even on the same plant.
 e. I fight the pests and weeds as organically as possible. When the garden starts to produce and we eat the first tomato or pepper, knowing it is clean of harmful synthetic chemicals is comforting. Also knowing the food came from 200 steps away and not 2,000 miles away along with the associated costs is well, rather satisfying.